Raft Building & Layout Guide
Plan an efficient raft around collection, storage, engines, farming, navigation and protected foundations.
← Raft Guide Hub · Progression Route · Resources
Build around function
A good layout reduces walking and keeps vital systems out of harm's way. Divide your raft into zones: front or side collection, central storage/crafting, food and water, farming and livestock, navigation, and machinery. Create clear corridors so you can sprint between workstations during attacks or storms.
Protect the footprint
Place valuable machines away from exposed outer foundations during the early game. The shark attacks unarmoured foundations; reinforce key perimeter sections with Foundation Armor once metal is available. Upper floors create useful space, but they do not eliminate the need to protect the foundations below.
Debris collection strip
Make your nets easy to reach and align them to catch debris efficiently. Place the bulk-resource storage area nearby so gathered items are not carried the full length of the raft. Keep an open walkway between nets, Smelters, Research Table and main building materials chest.
Food and water production zone
Group purifiers, water storage, crop plots, grill and Cooking Pot so one supply run services everything. Consider a separate livestock zone with Grass Plots. As the raft grows, the Electric Purifier and piping can reduce manual watering and water transfer.
Navigation and propulsion
Place the Receiver and three Antennas with the required clearance. Keep your Receiver where it is readable during steering. Engines must have enough working power for the number of foundations, and the Steering Wheel belongs in a location with a clear view and access to controls. Anchor controls need an unobstructed placement and sensible launch point.
Multi-floor considerations
Use upper decks for the navigation bridge, beds, decorative spaces and some farming, while keeping heavy resource loops convenient. Ladders and stairways should not trap players during combat. In co-op, ensure two players can pass without constantly blocking the same narrow deck.
Upgrade path
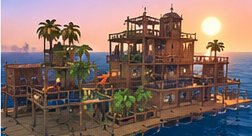
A practical raft can grow from a compact survival rectangle to a broad net line, then to a protected multi-floor home with powered engines and automated water. Don't demolish the entire layout every time you unlock a single improvement. Leave expansion corridors and build in phases.
A useful floor plan
An efficient small-to-medium raft can place nets across an accessible side, storage and processing centrally, kitchen and water next to crops, and steering on a raised deck with a clear view of the Receiver. Keep the anchor and engines on foundations where their placement rules are satisfied. Leave spare building space for the Battery Charger, Recycler and upgraded water equipment.
Step-by-step field checklist
- Reserve a stable, protected footprint for essential machinery.
- Plan a catch line for nets and accessible storage.
- Group water, food, crops and cooking equipment.
- Provide a visible helm with Receiver access and engine controls.
- Add vertical levels only once ground-floor logistics are efficient.
What to do if progress stalls
Building a huge raft increases engine requirements and maintenance. Expanding faster than supplies can support means constant shortages and repair interruptions. Leave a corridor to reposition engines, anchor and battery chargers.
Preparation and practical takeaway
Take a mental test walk between nets, storage, Smelter, food and steering. If it takes too long, move the stations rather than adding more foundations.